| Table of Contents | ||
|---|---|---|
|
...
| Expand | ||||||||||||||||||||||||||
|---|---|---|---|---|---|---|---|---|---|---|---|---|---|---|---|---|---|---|---|---|---|---|---|---|---|---|
| ||||||||||||||||||||||||||
|
...
| Info | ||||
|---|---|---|---|---|
JEMHC is designed for maximum interoperability using the same mail protocols that Jira supports, namely POP/s and IMAP/s (as well as FTP). Native communication with Exchange using MAPI is not currently possible - Exchange does support POP/s and IMAP/s, so those services need to be enabled and surfaced through firewalls for JEMHC to access (see https://technet.microsoft.com/en-us/library/jj657728(v=exchg.150).aspx ) Gmail: POP/IMAP setup - https://support.google.com/mail/troubleshooter/1668960?hl=en Gmail: Use email clients with IMAP or POP - https://support.google.com/mail/topic/3398031?hl=en&ref_topic=3396281
If you have setup rules that auto label incoming messages, those messages are accessed via their path:
Exchange POP/IMAP setup - https://technet.microsoft.com/en-us/library/jj657728(v=exchg.150).aspx |
Setup outbound mail sending
...
Now we will configure JEMHC to be able to send email notifications out to Jira users and also users without a Jira user account (we call them non-Jira users). The first thing to do is configure the outbound mail server connection.
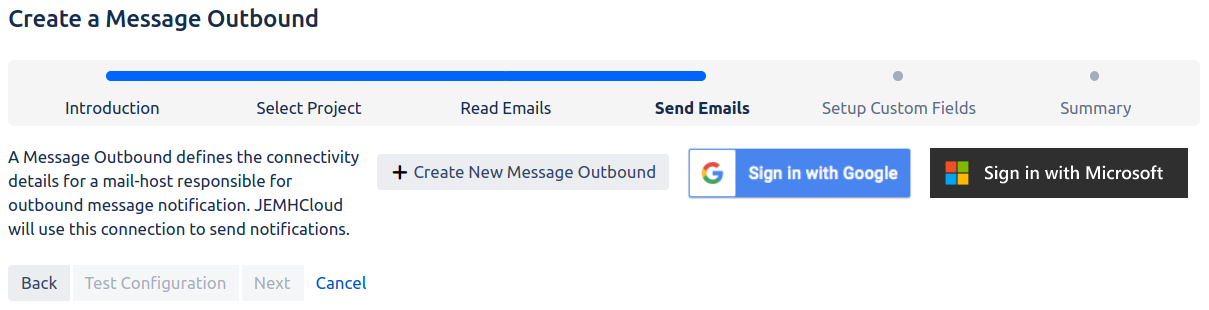
Similarly to inbound mail server configuration, we have the choice of manually defining a connection, or using single-sign-on with Google or Microsoft if desired.
Use the Test configuration button and submit the configuration once it is validated.
Click next to move on to the next wizard section.
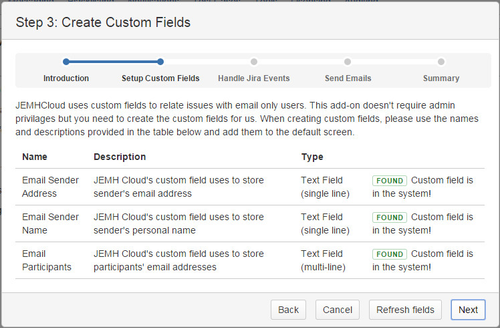
Setup Custom Fields
JEMHC needs to store email addresses in custom fields for email only user. These fields were defined in the Profile setup earlier, so will be found now:
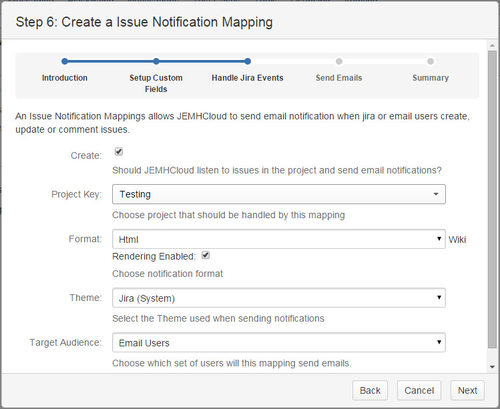
Handle Jira Events
This part of the configuration is for defining how JEMHC interprets events from Jira, used to drive notifications. In the next screen we'll define:
- Project Key : referred in the Profile, where issues are created by JEMHC with custom fields containing email addresses
- Format : the format email notifications should be in, TEXT or HTML. If HTML is enabled, you can also enable 'Wiki Rendering' such that Jira comments using wiki markup are pre-rendered for richer presentation in emails
- Theme : the Theme selects groups of templates that follow similar look and feel, Currently, Jira and Generic are available options
- Target Audience : JEMHC in this example is setting up for notifying Email Users, it has capability for notifying Jira users but that's not covered here
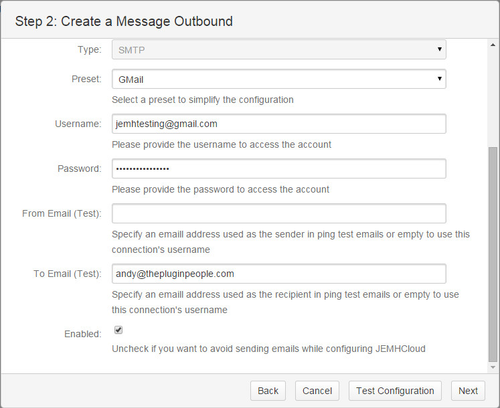
Send Emails
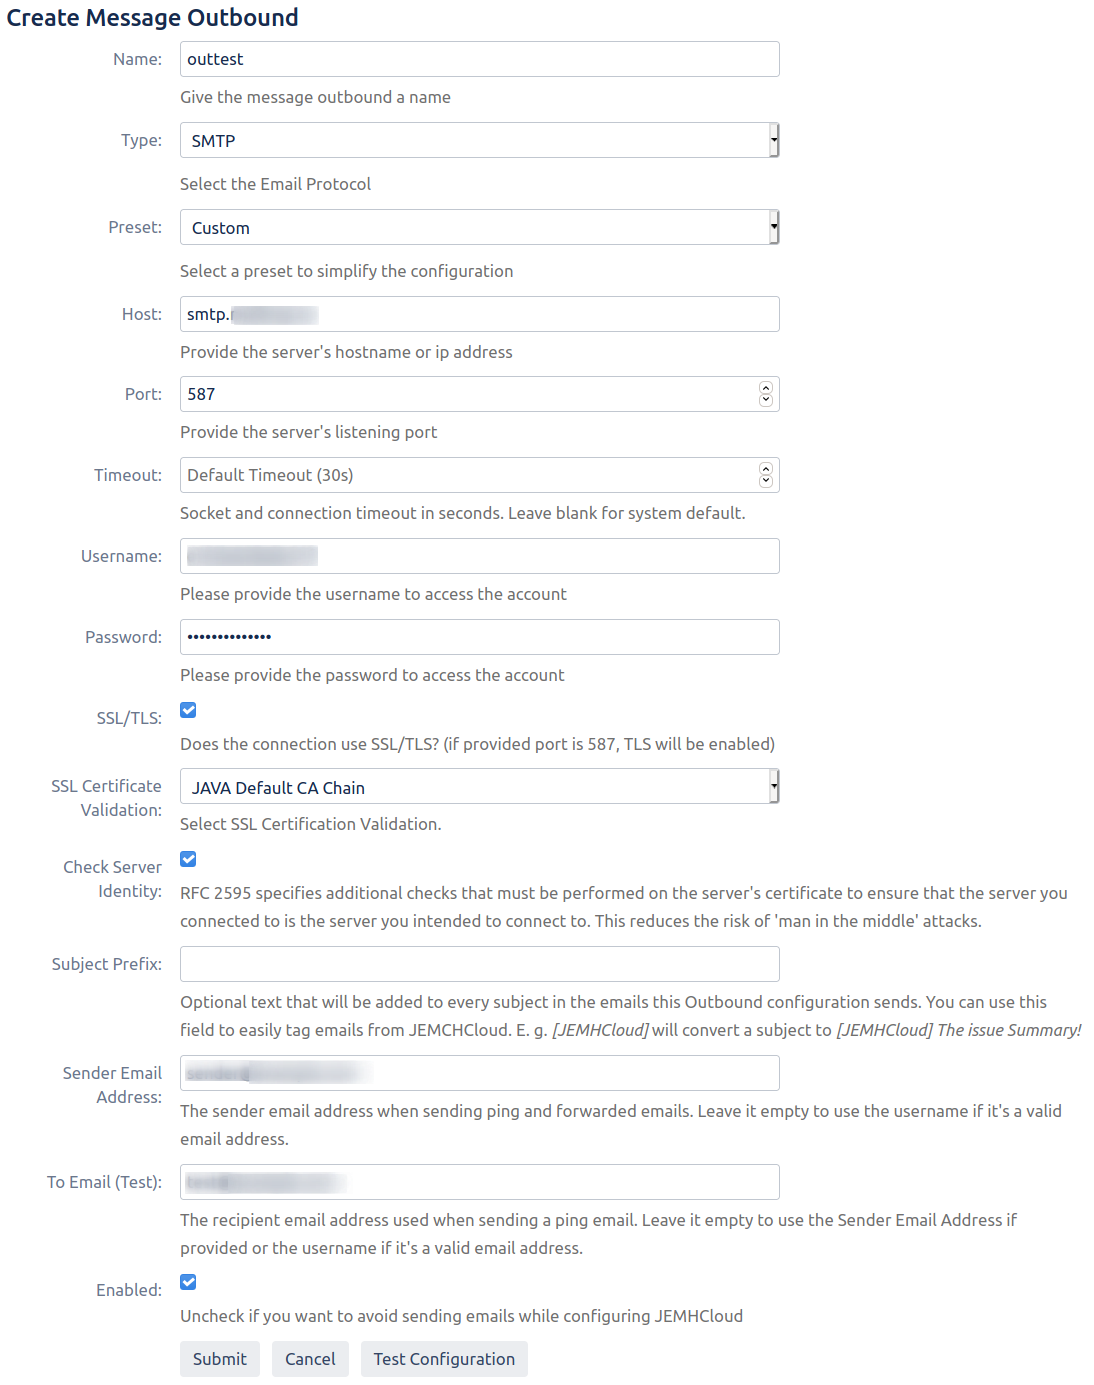
Next we setup the outbound SMTP server to use, POP and IMAP are supported, with simplifications available for Gmail and Yahoo, this example will use Gmail, for which the following fields are needed:
- Username
- Password
- To Email (Test) – set a test recipient, to be used by the Test Configuration button
- Enabled – makes the outbound mail server active (notifications will start to flow!)
Custom settings
JEMHC provide some standard presets, you can choose Custom to pick your own specific hosts and ports, but its on you to ensure values are correct! The following is a table of common outbound SMTP ports:
...
![]() JEMHC only supports TLS 1.2+ and only with AES 256 cypher suite or higher.
JEMHC only supports TLS 1.2+ and only with AES 256 cypher suite or higher.
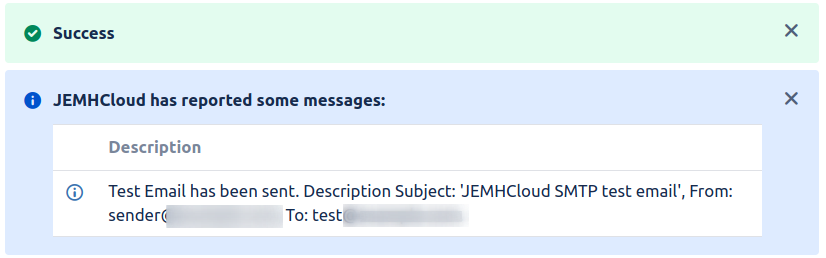
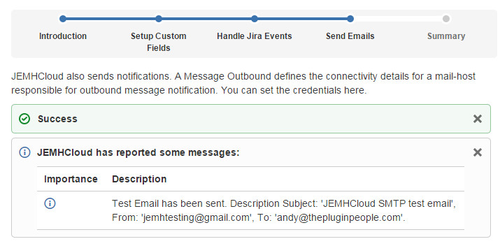
Testing the configuration
If authentication and connectivity is good, clicking Test Configuration should give you (feel free to not mail me!):
Review and Submit
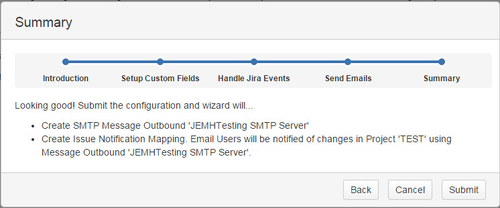
Click Submit to save settings:
 that these non-Jira users can be notified later. On this screen, we can select what custom field is used to store a non-Jira email sender's name and address. We can also choose what custom field is used to store non-Jira user email recipients.
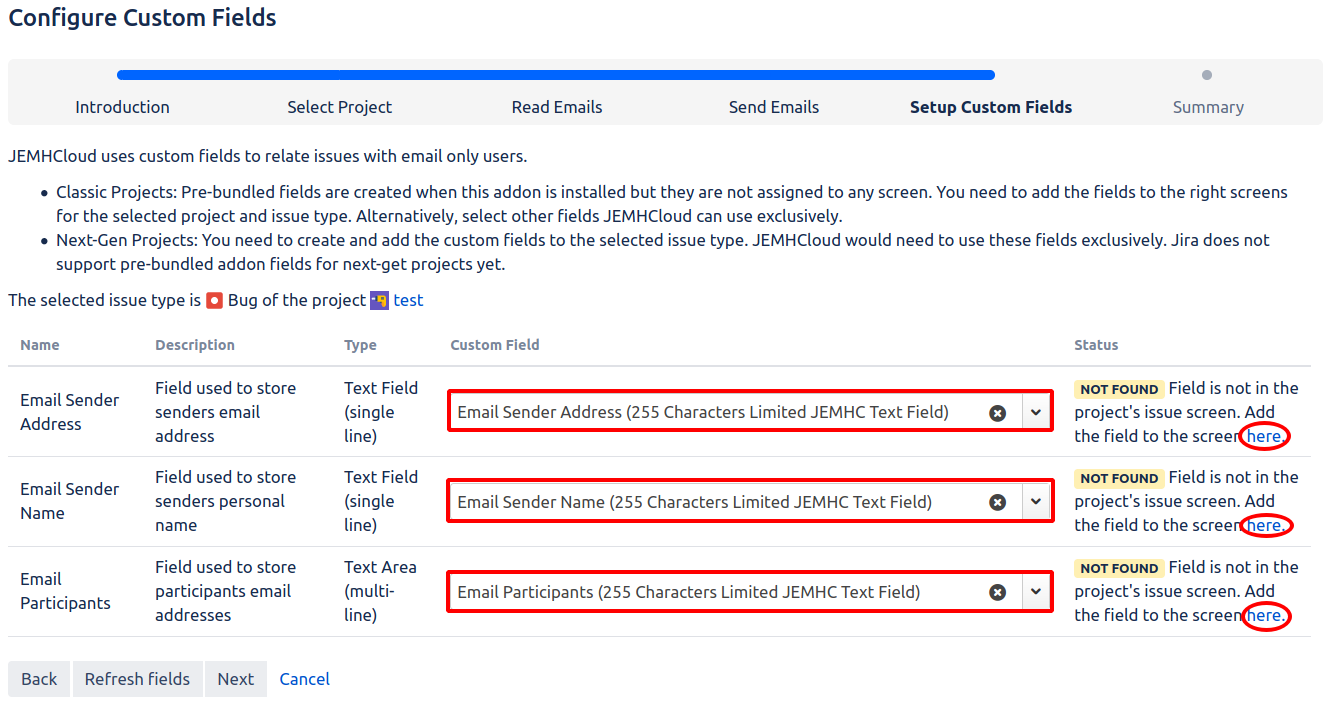
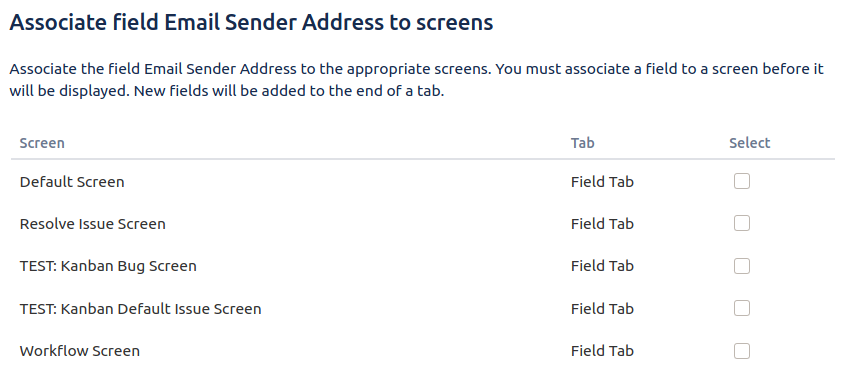
If JEMHC warns that a field is not present on the projects issue screen (as above), click the link in the message. You will then be able to associate the field with the appropriate screen related to your project
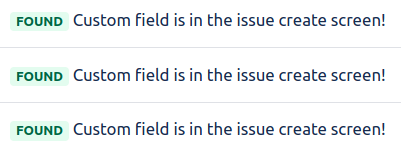
Repeat this process until all 3 custom fields of your choice are showing the status "found" in the wizard.
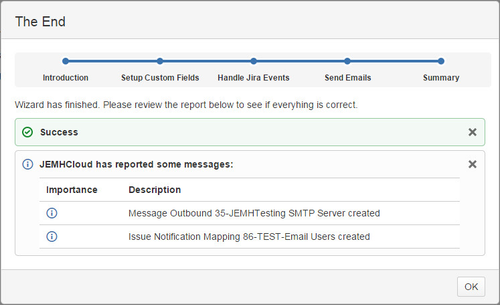
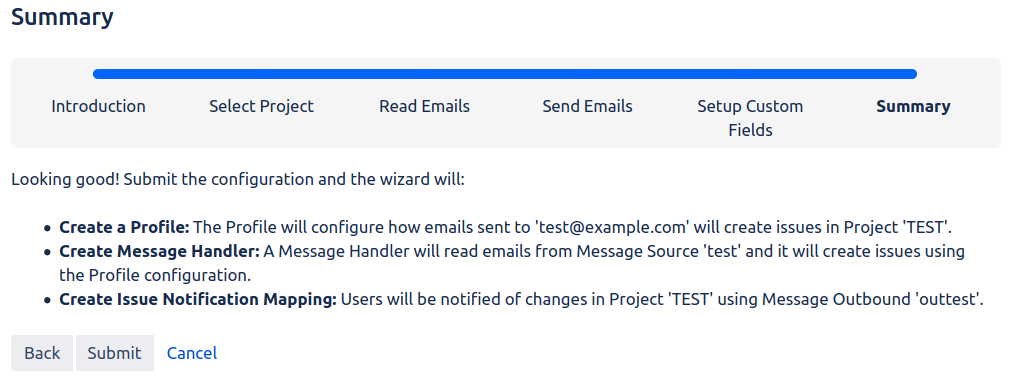
Click next once this is done. Finally, JEMHC will present you with a brief summary of the changes that will occur. Clicking submit here will complete the wizard.
On the final screen, you are given some suggestions of what to do next. If you would like to be taken to the JEMH welcome screen at this point, click Go to configuration.
Reviewing outbound settings
...
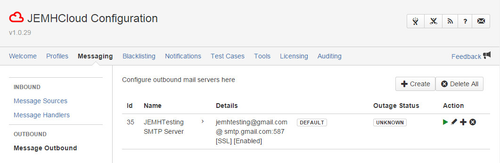
Outbound mail configurations are found under Messaging > Message Outbound:

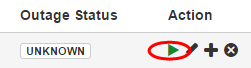
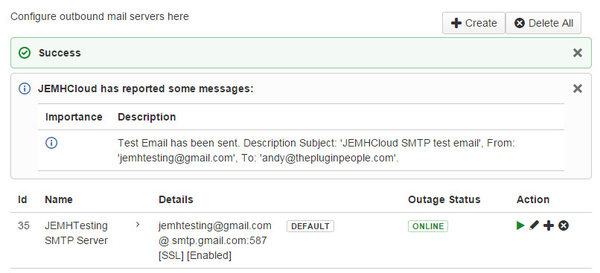
Until the mail server setting has been used, its status will be 'unknown'. To validate this, use the POLL action to send a test mail as before:

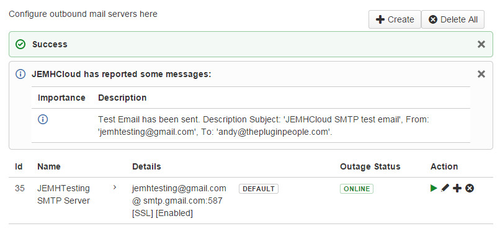
Outcome is that the SMTP server status is now Online (this would have happened anyway on first actual usage):
Issue Event Notifications
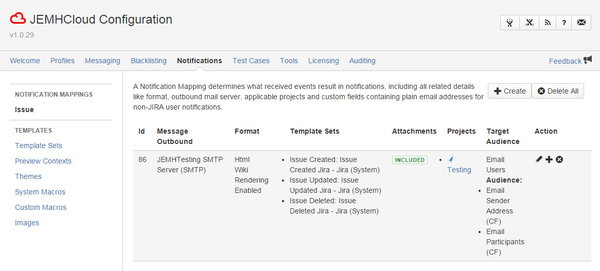
The configuration for controlling what Jira Projects will drive notifications is accessed through Notifications > Notification Mappings > Issue:

Testing outbound notifications
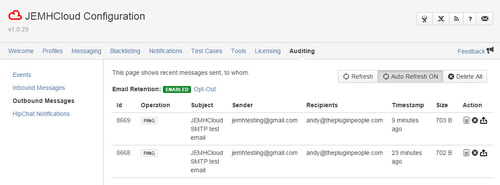
Recent outbound notifications can be reviewed through: Auditing > Outbound Messages, you can see the two ping messages already sent.

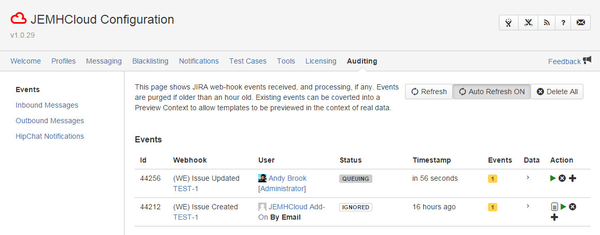
The Auditing > Events view shows the webhook events sent by Jira, and indicates whether they were handled or not. Commenting on the 'test' issue created earlier will be shown quite soon in the Events view:

Soon after that (about a minute) the notification will be sent, shown in the updated Outbound Messages view:

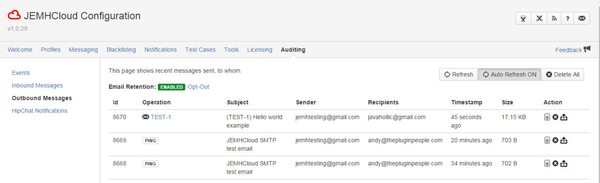
By default JEMHC will track all recent inbound and outbound notifications, retaining content of email in full in encrypted form within the database. At your option, you can opt-out of this retention, but diagnosing any formatting or processing issues will be much harder!
...
| Non Jira Service Desk (simple project) roles | Jira Service Desk project roles |
|---|---|
  |
|

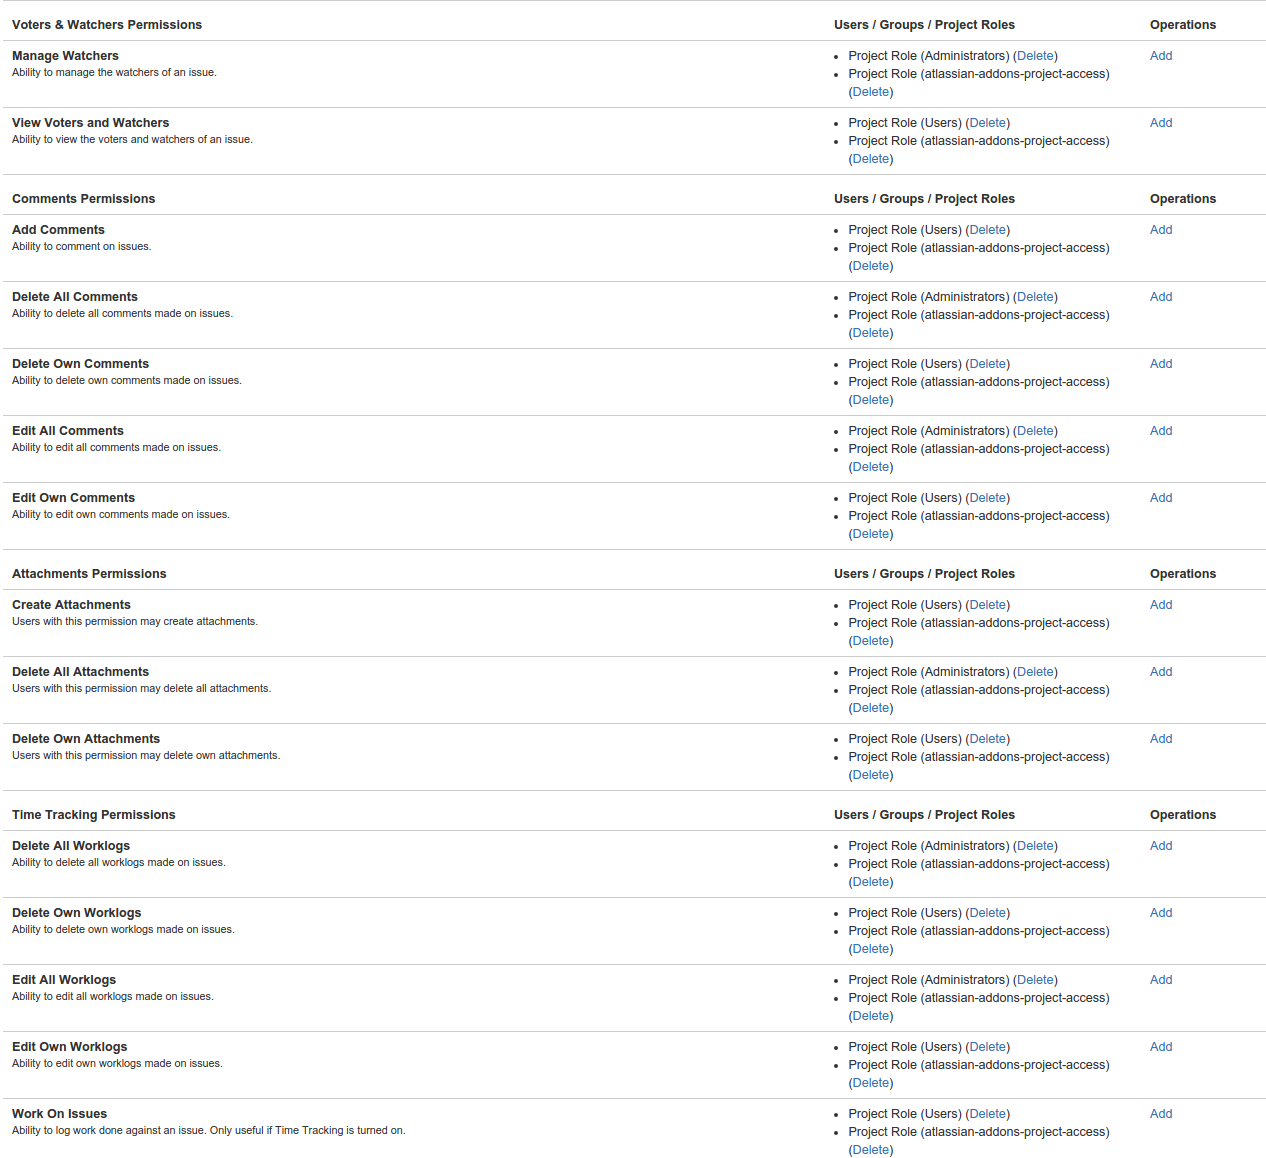
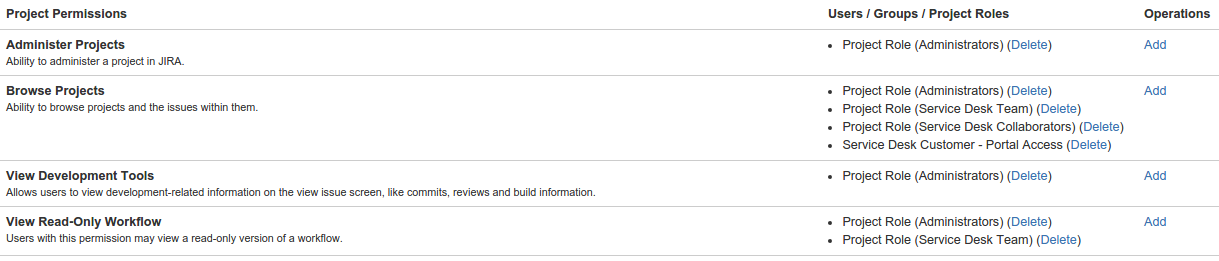
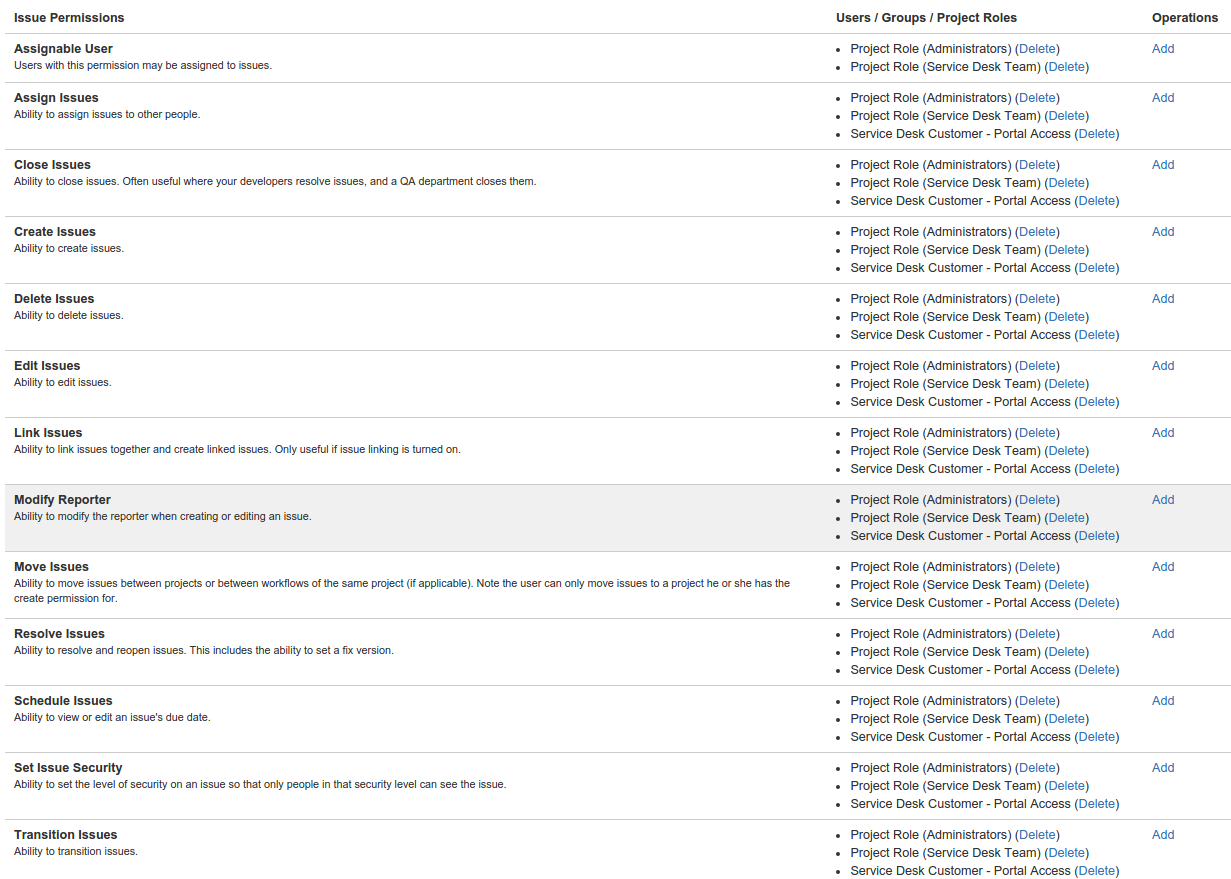
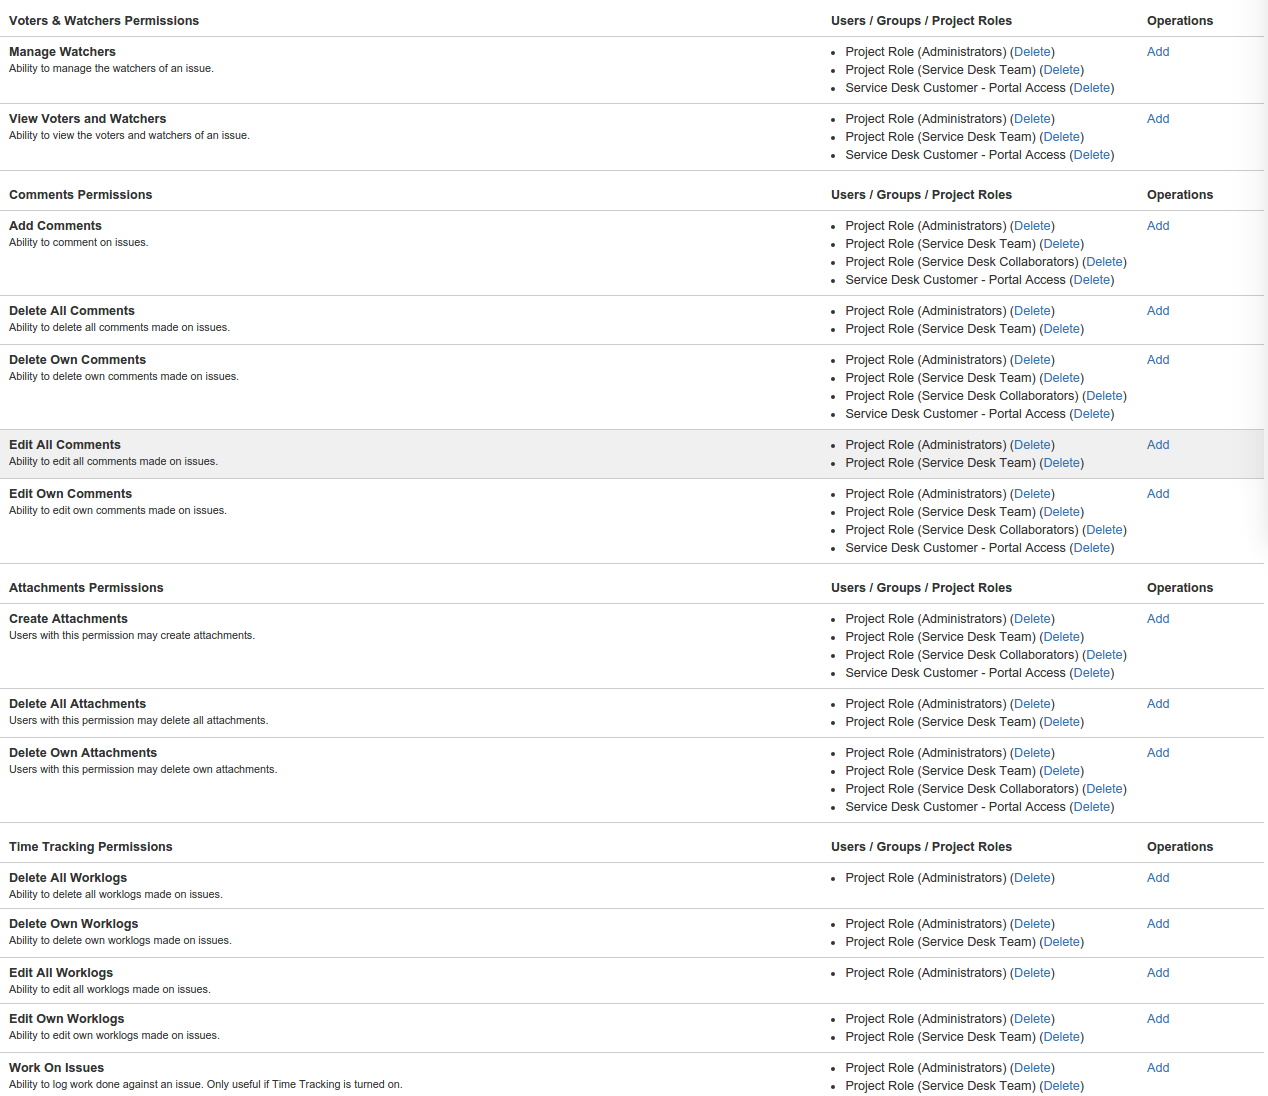
Default Permission Schemes
Standard Project

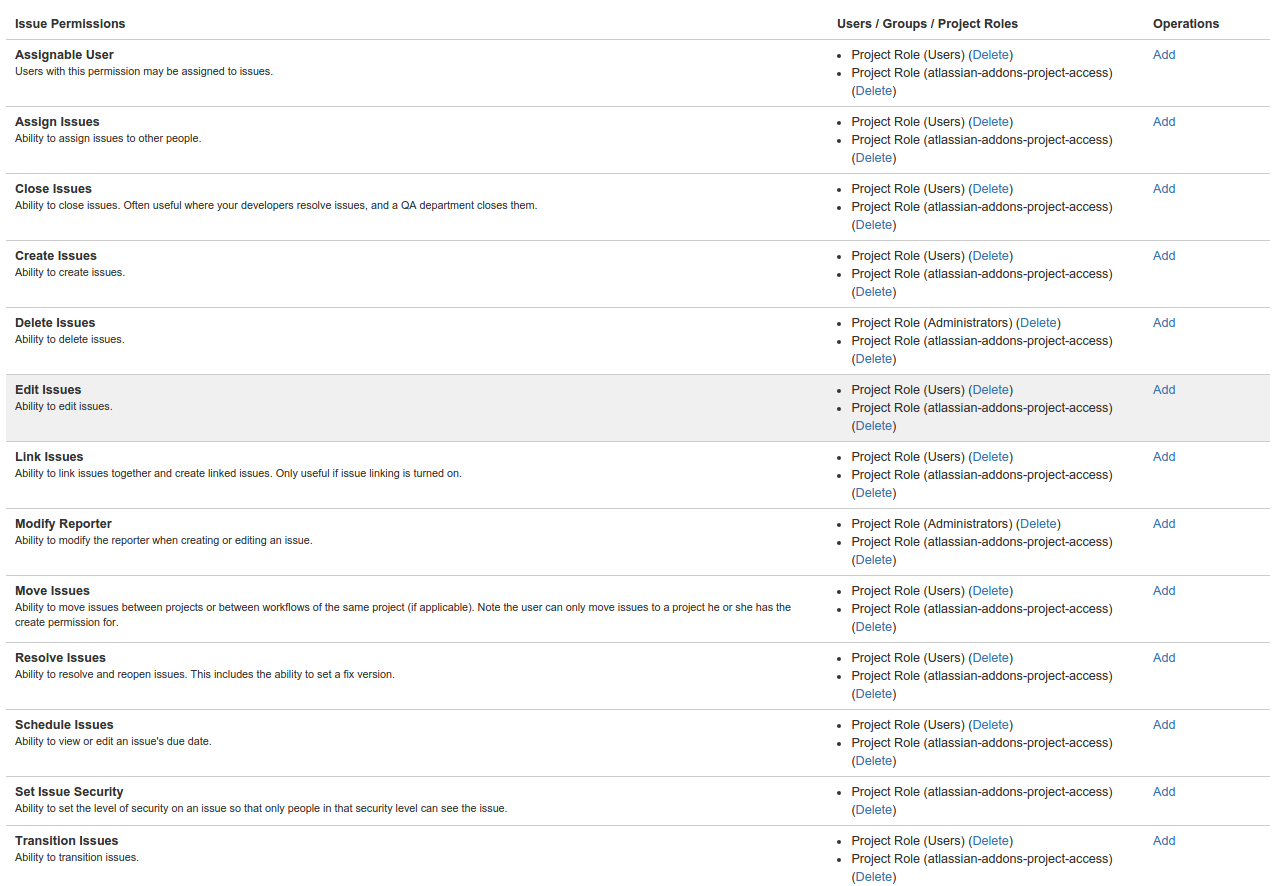


Jira Service Desk Project Permissions


About that Workaround User
...
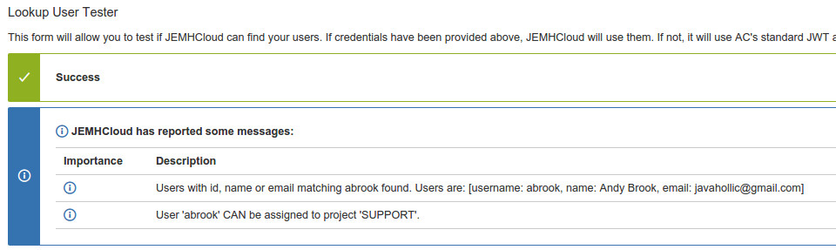
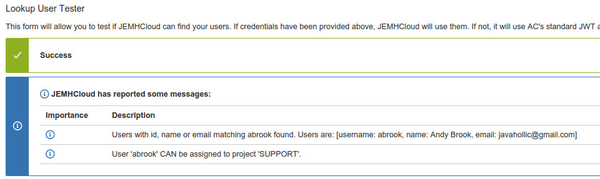
When everything is valid, setting a Username and a test Project, will result in confirmation:
About Atlassian ID
...