| Table of Contents |
|---|
Instructions for inbound retrieval
There are two way to authorize JEMHC to interact with users in your O365 domain:
Admin Grant Flow
The following flow means that the admin authorizes any user in your domain to authenticate with JEMHC and be used for mail processing by JEMHC. If you require to limit JEMHC to specific named users, this will require the User Grant Flow (this flow has additional authorization configuration within o365).
Add an inbound connection
...
JEMHC can be configured to communicate with your Microsoft 365 mail accounts in order to send notifications or receive email for processing.
Prerequisite setup in Azure Portal
As an Azure admin, ensure that users of JEMHC can request permissions via Microsoft Azure > Enterprise Applications > User settings. In order to save, you will also need identify Users/Groups/Roles
...
(2
...
) who will authorise
...
...
From the Messaging > Messaging Sources page, select Sign in with Microsoft
...
The permission screen will show as follows, indicating (1) who ‘you’ are if you’re signed into the o365 account, after reviewing permissions, check (2) and accept. Doing this will queue the JEMHC for admin authorization (effectively users can request access via the below, the admin has do it to actually accept):
...
...
This should show the connection:
...
Using the green PING icon will initially fail with: “Cannot read messages from message source. HttpErrorException: The remote server returned an error: (401)Unauthorized”. This indicates your O365 domain admin must approve this application. Its expected, see next where the domain admin authorizes the JEMHC application for use (this is done once only, further mailbox setups will then just work)
...
After a data replication delay of a few minutes you should be able to see the JEMHC application listed under your user in Azure Active Directory:
...
Go to Enterprise Applications by either clicking on the application or Searching Enterprise Applications in the search bar as shown below:
...
On the Permissions screen, select “Grant admin consent” for your domain, review the permissiosn required again, and sign in as your domain admin persona to approve JEMHC.
...
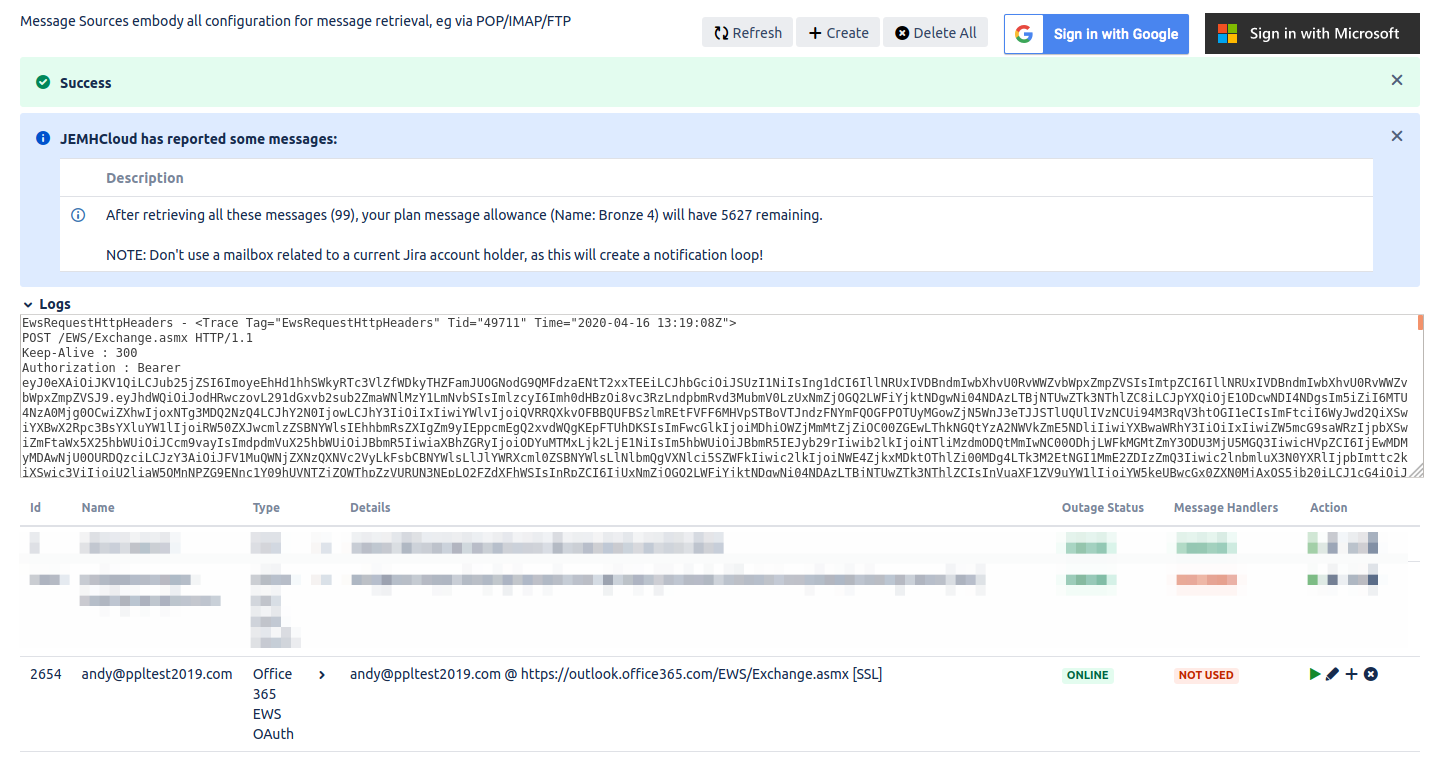
Test the Oauth mailbox by using the JEMHC ping action:
...
You should see the Outage Status now report ONLINE, and an info message showing how many messages are in the mailbox waiting.
...
The mail source is now ready for use. A mail handler can now be created to associate the incoming mail source with a Profile.
Creating an outbound EWS connection with Oauth
If only creating an outbound connection, the process for inbound will be needed on the outbound screen. Once the inbound mail has been duly authorized by the domain admin, you will be able to just create outbound connections, authenticating using Oauth.
We can test outbound with the JEMHC PING action on the outbound entry:
...
An infobox will then be shown, along with a connection log:
...
Again, all done!
User Grant Flow
![]() We currently do not have a worked solution for user grant flow, its in progress with MS Support
We currently do not have a worked solution for user grant flow, its in progress with MS Support
Whilst initial account authentication via Oauth will succeed, actual runtime usage will generate authorization failures if specific authorization steps for the approved users is not performed.
See also:
Create a new inbound o365 Oauth connection
...
JEMHC should show the connection:
...
Hitting the green Play icon will initially fail:
...
Authorization steps:
Update Properties to make User assignment required

Got o User and Groups, add a user by clicking on “None Selected”:

Search for and select the target user to see the user is now allocated to the Application

IN PROGRESS: In addition, something else is required. We are in touch with MS Support on this topic and hope for a resolution soon.
Support for multiple recipients
As many customers using O365 and EWS with JEMHC will potentially want to use Project Mappings where the address is used by JEMHC to route mail to many projects through a single pickup mailbox, the options are as follows:
Sub addresses
As per Sub address support finally coming to Office 365 in Q3 2020 this is reported to now work but doesn’t “just work”:
Some Powershell twiddling as admin is needed to enable:
| Code Block |
|---|
Set-OrganizationConfig -AllowPlusAddressInRecipients $true |
Apparently this still only works with mailboxes, not for DL/group addresses.
Account Aliases
As of AUG 2020, O365 seems to support mailbox aliases:
| Note |
|---|
Email Aliases in o365 take 24 hours to become valid, prior to this they will be rejected (shown below) |
...
Retaining in the incoming address in outbound mail
![]() O365 doesn't yet support this, the feature is there in JEMHC, described here:
O365 doesn't yet support this, the feature is there in JEMHC, described here:
You may also want to retain the incoming ‘alias’ address for use in all outbound notifications. JEMHC does this through Custom Field defaults:
Storing the $catchemail (see end of : Setting a custom field value )
Using the custom field during sending:Vary Notification Sender Email Address Between Issue Types
We found the following on the web (cannot really dig more into o365 mail configuration):
Apparently, the ability to “send email from alias addresses to the Outlook Web App“ is on their roadmap, it may take a while to become real (its listed as DEC 2020…) by comparison, Gmail GSuite/Apps support for this ‘just works’:
The ability to send email from a proxy address (aka alias) other than the sender's primary SMTP address is useful in multiple scenarios, such as mergers and acquisitions when you need the to send from multiple branded domain names, or sending on behalf of a team or department, like info@contoso.com. And of course, having the FROM and REPLY TO boxes preserve that alias when the recipient sees it is just as important. So to kick-off our journey to provide you and your users with the flexibility to send email using alias, we're excited to announce that soon Outlook on the web (aka OWA) will natively support the ability to choose the sender or FROM from a drop-down list right within the compose pane. And when the recipient receives that message, the FROM and REPLY TO will show that alias, regardless where the recipient's mailbox happens to live.
...
Feature ID: 59437
...
Added to Roadmap: 12/5/2019
...
admin consent requests from users configuring JEMHC.
...
Granting consent
| Anchor | ||||
|---|---|---|---|---|
|
In order for JEMHC to access your mail accounts, it needs specific permissions. These permissions are delegated type permissions, meaning that JEMHC is delegated with the permission to act as a signed-in user when it interacts with mail accounts.
Consent needs to be given for JEMHC to use these permissions. Consent can be granted either by a single user (user consent) or for all users by an administrator (admin consent).
User consent
Usually you will want to grant consent on a per-account basis. Below is an example of a user consent screen that will be shown when creating a Microsoft 365 message source for JEMHC. The checkbox is only seen when when signed into an admin account, and changes the consent to an organization-wide admin consent.
...
Note that legacy EWS type connections don’t work with user consent. These connections must use admin consent. The default and recommended Graph type connections work with both consent by individual users and admins.
Admin consent
Once the JEMHC application is listed in Azure Portal as an Enterprise Application, you can choose to consent for all accounts in your organization. This means the above user consent screen will not be shown when connecting JEMHC to Microsoft 365. This can be done via Azure Portal > Enterprise applications > Enterprise Mail Handler for Jira Cloud (JEMHC) > Permissions.
Creating a connection
The following can be done via the Message Sources or Message Outbounds page under the Messaging tab, depending on whether you want to process or send emails respectively.
From the top right of the screen, select Sign in with Microsoft

At this point, you may be asked to grant consent to JEMHC acting on behalf of the signed in user. See the previous section on granting consent for more information.
After granting consent to the request, a screen confirming successful authorization is shown:

Returning to JEMHC, you should now see the new connection:

Clicking the green ping icon will then test the connection. A successful test will look similar to this:
The mail connection is now ready for use. These steps are identical for setting up both Message Sources and Message Outbounds.
Connection types
There are currently 2 types of connection JEMHC can make with Microsoft 365. Graph API connections make use of the Microsoft Graph API in order to access resources. These are recommended, and the default when the “Sign in with Microsoft” button is used inside the JEMHC UI.
Before addition of Graph API connections, EWS API connections were used. This connection type can still be created via the “create” button in the JEMHC UI, but will be removed at a later date.
Related articles
| Filter by label (Content by label) | ||||||||||||||||||
|---|---|---|---|---|---|---|---|---|---|---|---|---|---|---|---|---|---|---|
|
| Page Properties | ||
|---|---|---|
| ||
|