JEMHC Project Mappings allow fully-flexible Rule driven routing of email to projects. This guide will describe JEMHC Project Mappings in detail, and provide examples to illustrate their use.
![]() It is not necessary to have a production mailbox setup to drive inbound issue creation, JEMHC Test Cases can be used to inject an email into the processing pipeline.
It is not necessary to have a production mailbox setup to drive inbound issue creation, JEMHC Test Cases can be used to inject an email into the processing pipeline.
| Table of Contents |
|---|
Background
Profiles
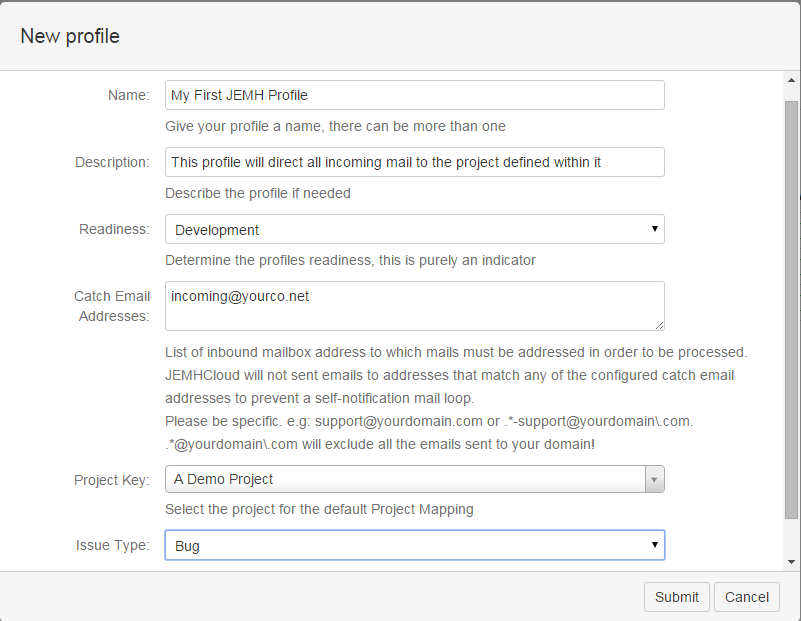
A JEMHC Profile drives how incoming emails are handled in every detail, this includes the JIRA project that issues should be created in and much much more!
...
Scenario 1 : Create a Profile
Create a basic Profile
Create a Profile:

Defining the "Catch Email Address" of your inbound mailbox, the target Project, and the IssueType:
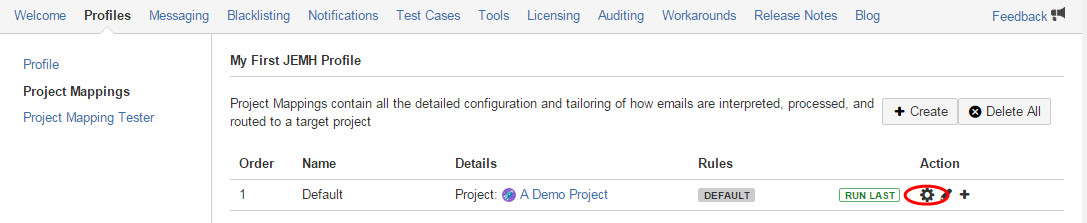
See the new Profile, configuration of which is through the cog icon, it can also be copied the + icon, as well as exported (useful for support!) and deleted.


A summary of key information in the Profile, indicating defaults, can be seen by expanding the Catch Email Address
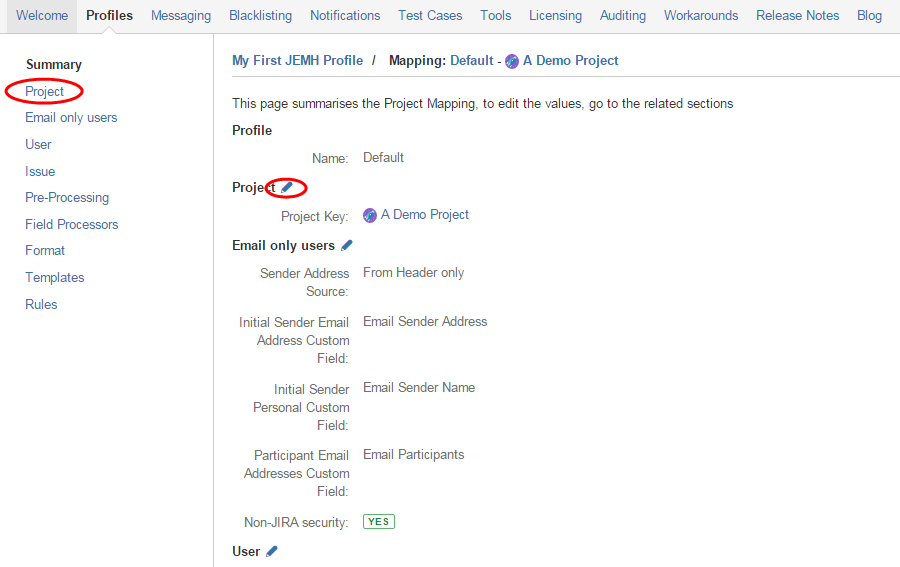
Use the Cog Icon to access the Profile, from here it is possible to edit some profile top level settings (1), and to gain access to the Project Mappings (2).


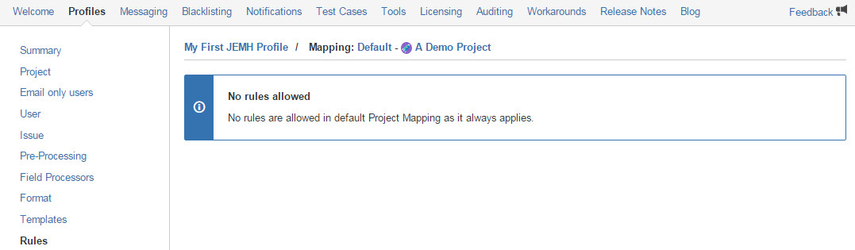
Accessing the Project Mappings will show just the default Project Mapping, the lack of rules is shown by

. Configure the Project Mapping via the cog icon:
The Profile view shows the vertical nav that will take you to specific sections of the Profile, in the main panel view are summaries of each section, with a Pen icon, which also takes you to the edit view of the section:
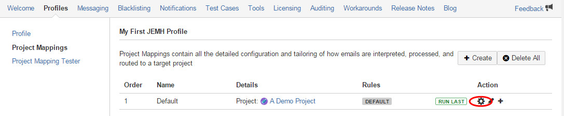
To reinforce the 'default' nature of this Project Mapping, access the Rules link from the vertical nav:

Validate Profile handling
Validating expected outcome of email handling can be done quickly and easily with a JEMHC Test Case, where an 'email' can be crafted with a valid TO: address that matches the "Catch Email Address" in the profile (your mailbox inbound address).
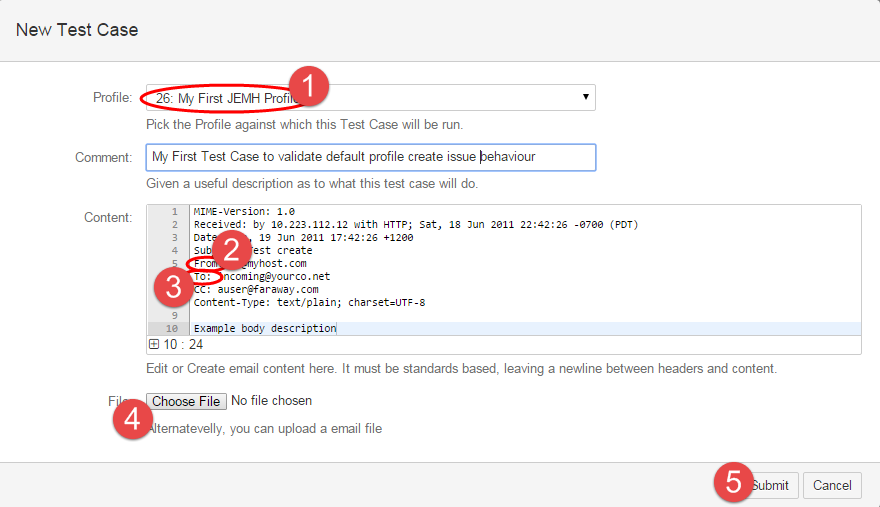
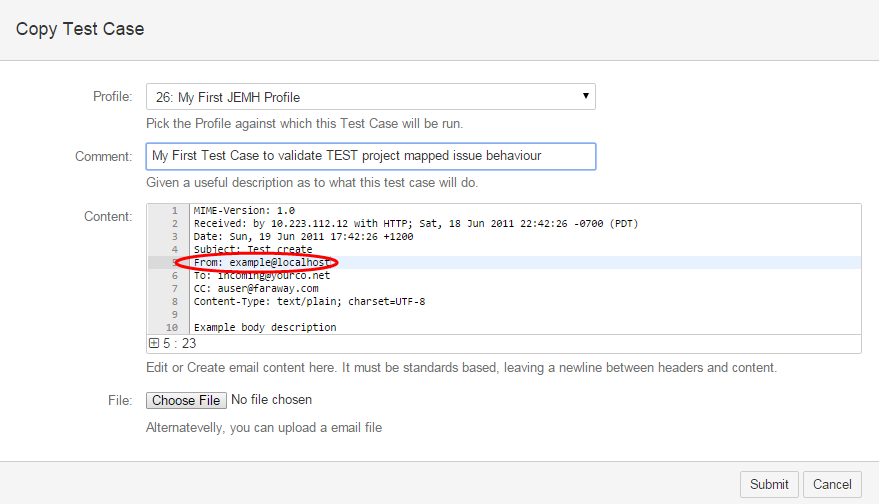
Create a Test Case:


Whats shown next is the platform neutral standards based format for a simple text email, select the profile created above (1), then set the From: SMTP address (2) to be something valid, and the To: address (3) to be the Profile "Catch Email Address". From this screen its also possible to upload (4) a previously exported email (in this neutral TEXT format, not a proprietary binary .msg format). Finally hit Submit to save (5):
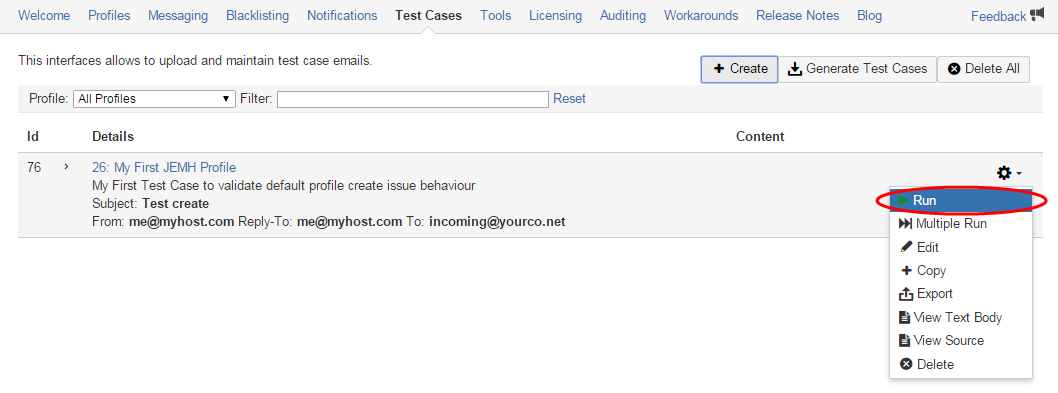
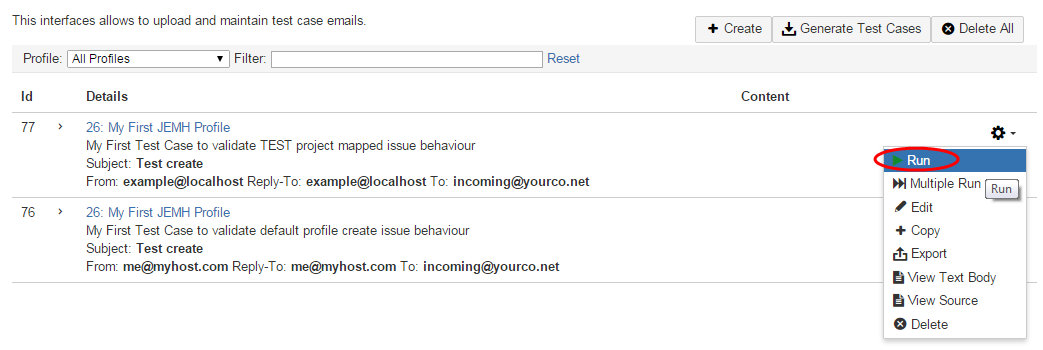
The Created Test Case can now be run against the Profile it's associated with:
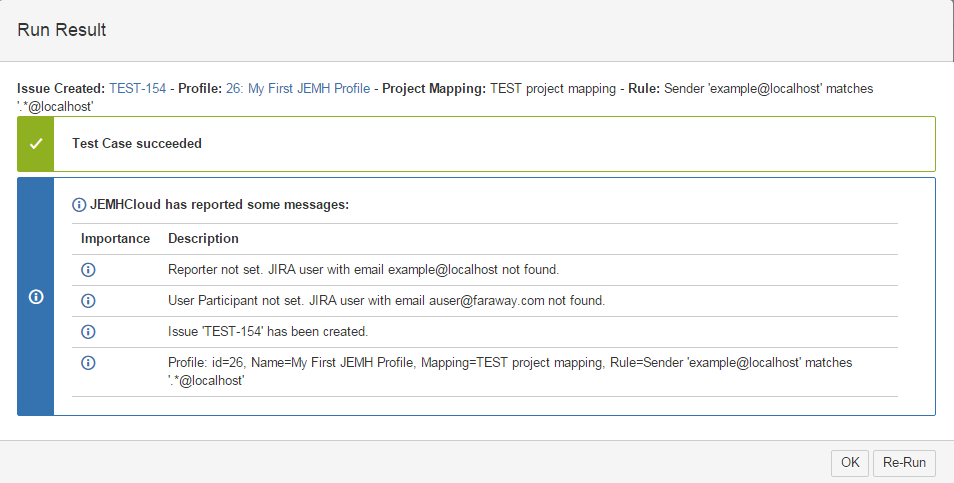
The Result of running a Test Case will show the Issue Key of the created issue, and some other info:
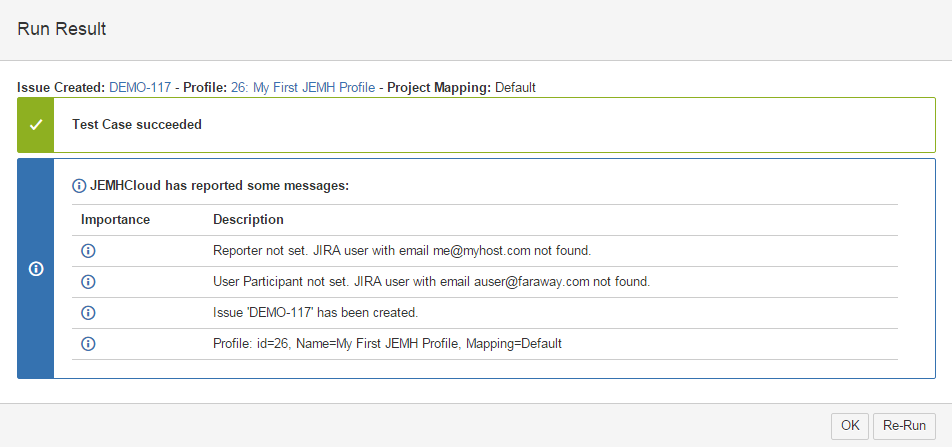
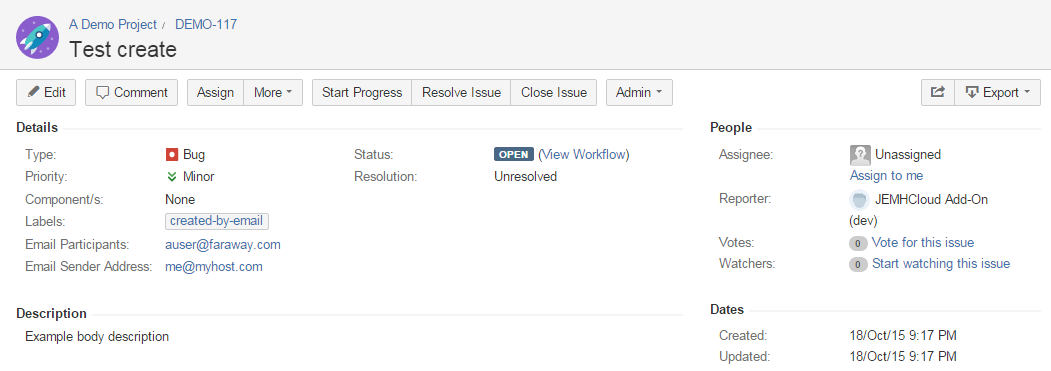
As custom fields already exist for 'Email Sender Address' and 'Email Participants' the resulting issue would look like:
Summary
In this scenario, all mail will end up in the given project, that's it. For more flexible use of one profile to route mail to different projects, see following scenarios.
...
A project mapping rule can be made up of one or more of the following criteria:
Rule Type | Description | Example Value |
|---|---|---|
From |
regexes | A list of regular expressions that are used to match against the email sender address. Note that this is matched against the email address part of the sender header, personal names are not considered. |
| ||
Recipient |
regexes | A list of regular expressions that are used to match against the email recipient address. Note that this is matched against the email address part of the sender header, personal names are not considered. |
| ||
Keywords | A list of strings that are used to match against text in the email subject or body (or both). |
|
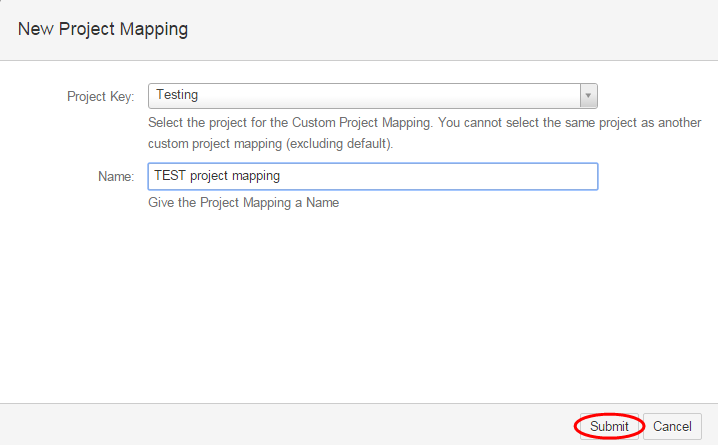
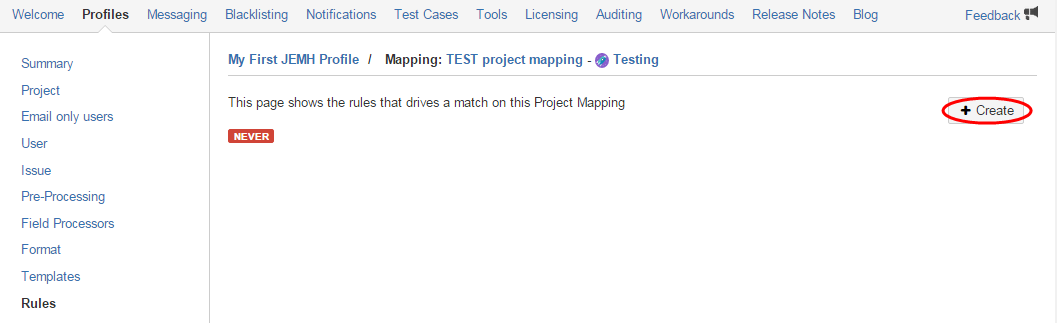
Create a new Project Mapping
In the Profile Project Mappings view, hit Create:


Set the Project and give it a name, then hit Submit
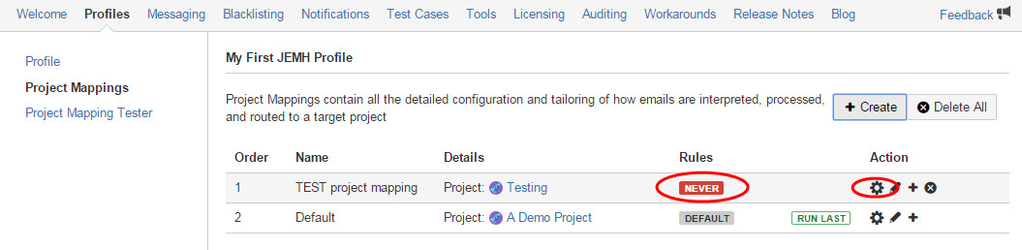
This Project Mapping doesn't yet have any Rules, so will never be used, indicated in the post-Submit view -

. Use the Cog icon to configure the Project Mapping:

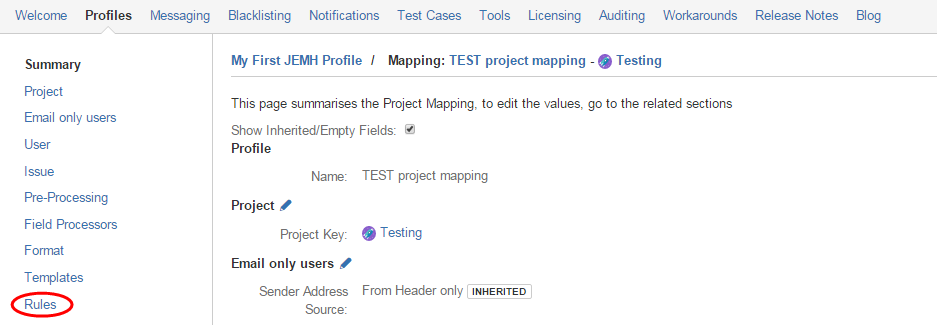
Here the TEST Project Mapping is now available for configuration, all fields marked

will without further change, automatically take on the value defined in the Default Project Mapping (by the way, this is to minimize the amount of configuration that needs to be done!). Access the Rules section now:
Initially, with no rules defined, again
will indicate the Project Mapping wont be used, so hit Create to define one:
Rules can be created that match using regular expressions on the From or To (recipient) addresses defined in the email, as well as keywords, in this example, we'll map any sender from the @localhost domain with the regular expression .*@localhost (in regular expressions, * means any number of the preceding character not all characters, to match any character . is used, hence
.*to match everything):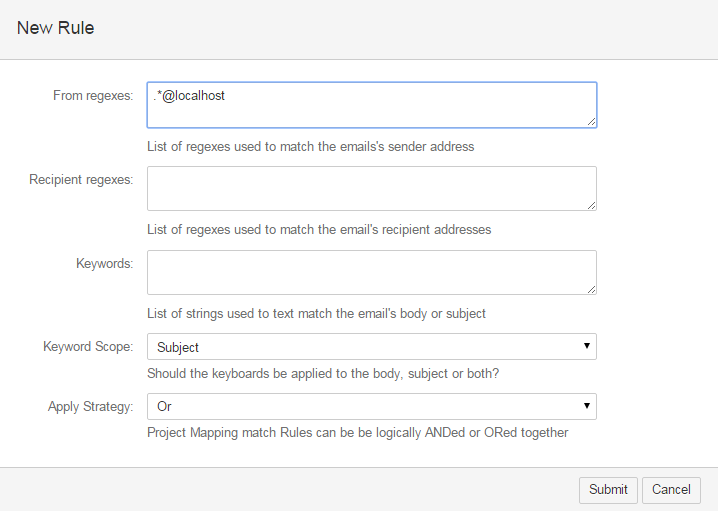
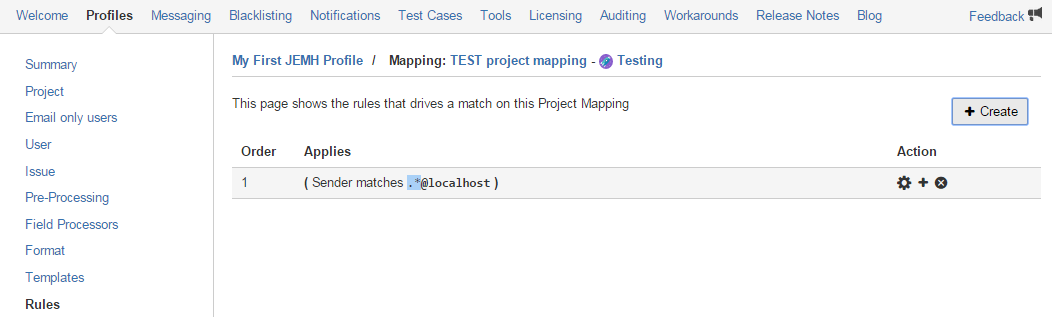
After submitting, the summary for the rule is shown:
Validate new Project Mapping
With this project mapping rule in place, any mail from @localhost will get handled through this Project Mapping, and be created in the TEST project
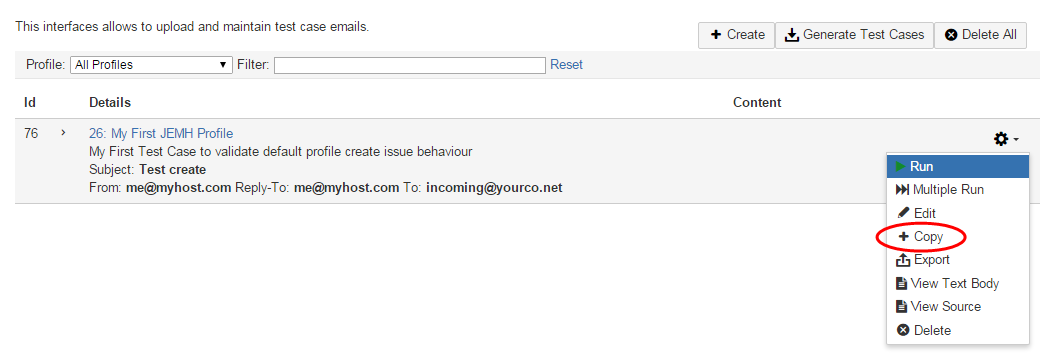
Create a new Test Case with a From: address of example@localhost and a To: address of the usual catchemail (incoming mailbox) address. To do this, create a copy of the Test Case that was made earlier, using the copy option to get going:
Change the From: address for this case to example@localhost and Submit
After saving, run the new Test Case:
The Test Case post-execution result screen shows that an issue was created in the TEST project, and specifically, through the Rule: Rule=Sender 'example@localhost' matches '.*@localhost'
| Info |
|---|
Managing many catchemails and mapping through Project MappingsIts possible to use one Profile, with one Project Mapping per 'inbound mailbox', in order to do this, the top level 'catchemail' addresses must include ALL inbound mailboxes. The simplest way to do this is with email aliases to a common account, for example, e.g.: "support@yourcosupport@yourco.com" with aliases "aaa-support@yourcosupport@yourco.com, bbb-support@yourcosupport@yourco.com, ccc-support@yourcosupport@yourco.com", with these aliases present all mail ends up in one mailbox, then the "Catch Email Address" can be as easy as:
Then, Project Mappings can be associated through a Domain rule matching the full actual inbound mailbox address. |
Related articles
| Filter by label (Content by label) | ||||||||||
|---|---|---|---|---|---|---|---|---|---|---|
|
...
|
| Page Properties | ||
|---|---|---|
| ||
|