Jira sends a JSON webhook payload to JEMHC for each issue event that occurs. JEMHC uses the event content to generate notifications. This guide shows how to extract custom data from an event and render it in your notification templates.
Preview contexts
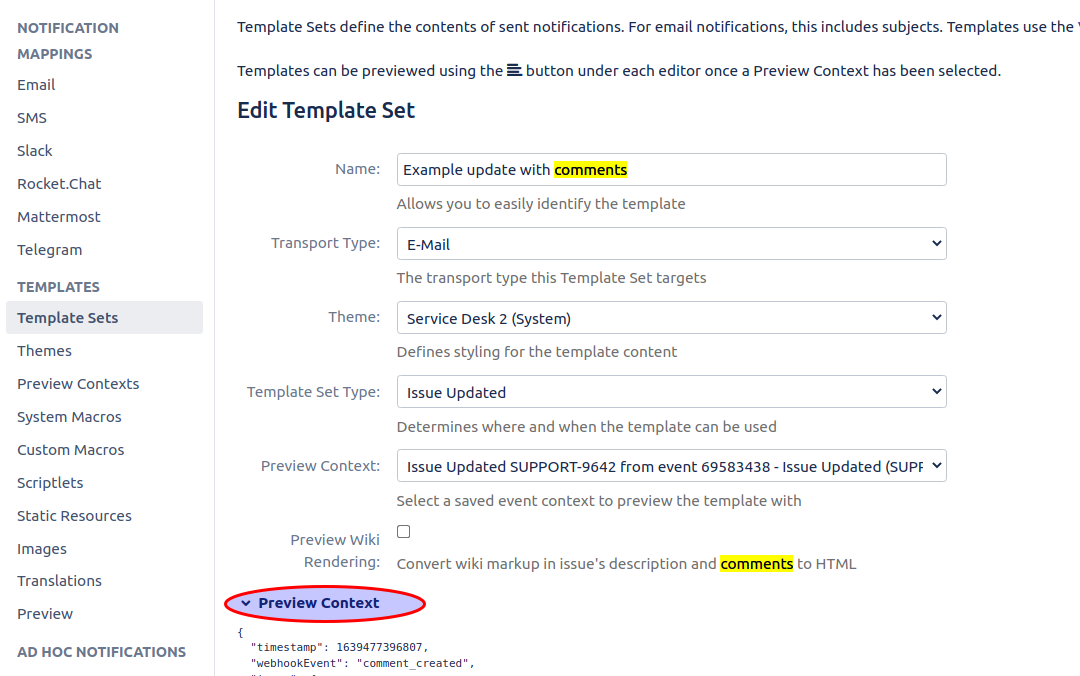
A Preview Context contains webhook event data for a previously processed event. This context allows previews of notification Templates at edit time. In this example, we'll add custom content for the resolution of an issue. By default there are only Created, Updated and Deleted event templates, so this will be a modification to the Updated event template.
Convert a received webhooks from JEMHC > Auditing > Events, into a Preview Context that can be used with Template Sets.
Create Custom Macro to provide detection logic and rendering of required content
Creating Preview Contexts
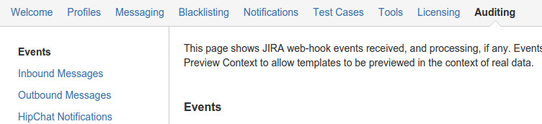
Go to Auditing > Events and locate an issue event that has been processed.
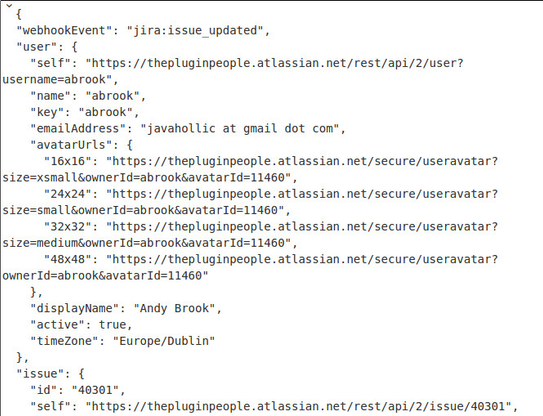
An event entry will look something like this:

The > icon before the actions on the right can be expanded to show the webhook data:
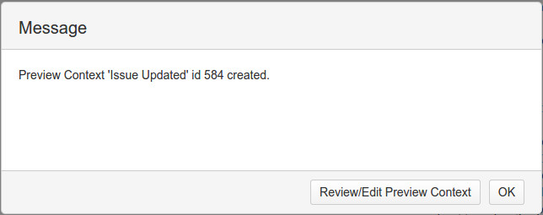
Clicking the + icon converts that data into a Preview Context:
Using Preview Contexts
Simplified, the webhook structure can be seen below. Full details on the webhook data structure can be found in this Atlassian documentation.
 {
   "timestamp"
   "event"
   "user": {
     // See User shape in the linked document
   },
   "issue": {
     // See Issue shape in the linked document
   },
   "changelog" : {
     // See Changelog shape in the linked document
   },
   "comment" : {
     // See Comment shape in in the linked document
   }
 }
The $context reference used in all templates represents this webhook data structure. It important to know that it is a reference to an object of type ObjectNode.
Working with simple values
The values in all nodes like $context.issue.id result in the value shown in the webhook data. For example "40301". The quotes normally need removing, and this can be done with $context.issue.id.asText().
Most properties lie under the $context.issue.fields prefix, as shown:
field | expression |
|---|---|
Issue Key |
|
Project Key |
|
Description (as Text) |
|
Description (as HTML) |
|
Custom Field Value (Text) |
|
Custom Field Value (Single Choice) |
|
Custom Field Value (Multiple Choice) | #foreach ($item in $context.issue.fields.customfield_13600) $item.value.asText() #end |
Reporter Display Name |
|
All Comments (if present) | <h1>Prior Comments</h1> <p>Issue $context.issue.key.asText() has $fields.comment.total comments</p> #foreach( $comment in $fields.comment.comments ) <h3>Comment created $comment.created.asText()</h3> $jemhUtils.wikiToHtml($comment.body.asText()) #end |
Access individual comments | <h2>STATIC comment extract</h2> <pre> 1) $fields.comment.comments[0].id -- $fields.comment.comments[0].created -- <p>$fields.comment.comments[0].body.asText()</p> 2) $fields.comment.comments[1].id -- $fields.comment.comments[1].created -- <p>$fields.comment.comments[1].body.asText()</p> 3) $fields.comment.comments[2].id -- $fields.comment.comments[2].created -- <p>$fields.comment.comments[2].body.asText()</p> </pre> |
Display comment is reverse order | <h2>REVERSED comments</h2> #if ($fields.comment.total >0) #foreach($i in [1..$fields.comment.total]) #set ($actualIdx = $fields.comment.total - $i) #set ($comment = $fields.comment.comments[$actualIdx.intValue()]) <p> <h3>Comment created $comment.created.asText()</h3> $jemhUtils.wikiToHtml($comment.body.asText()) </p> #end #else no comments yet #end |
Labels |
|
Working with dates
Date timestamps | #set( $createdStr = $comment.created.asText() )
#set( $timeStr = $createdStr.substring($createdStr.indexOf('T')+1) )
#set( $timeSplit = $timeStr.split(":"))
<h3>Comment created date: $createdStr.substring(0,$createdStr.indexOf('T')) at $timeSplit[0]:$timeSplit[1] </h3>
|
Date (translate ISO dates) | #set ($dateObj = $dateFormatter.getDate($comment.created.asText())) $dateFormatter.format($dateObj, "dd/MMM/yy h:mm a") |
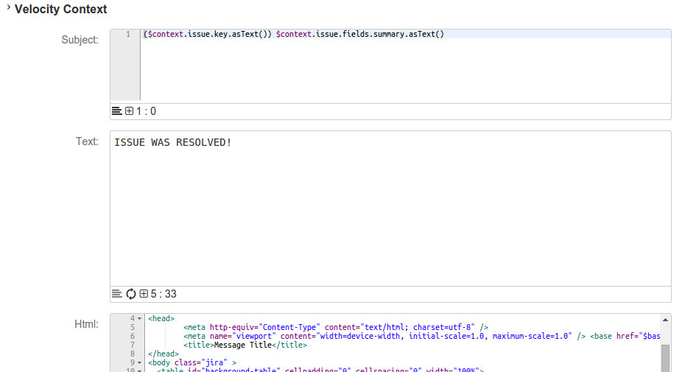
Create a custom macro
The System Macros show macros defined within JEMHC and inherited by all instances:
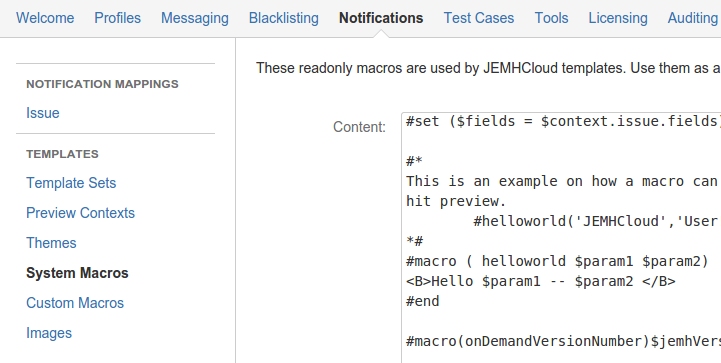
Here is a hello world macro, which takes two parameters, accessed through $param1 and $param2 inside the macro body.
You can define references inside macros that are then available afterwards to the caller. This is useful for flagging specific situations, which is what we will do with the issue resolved status.
#macro ( helloworld $param1 $param2)
<B>Hello $param1 -- $param2 </B>
#end
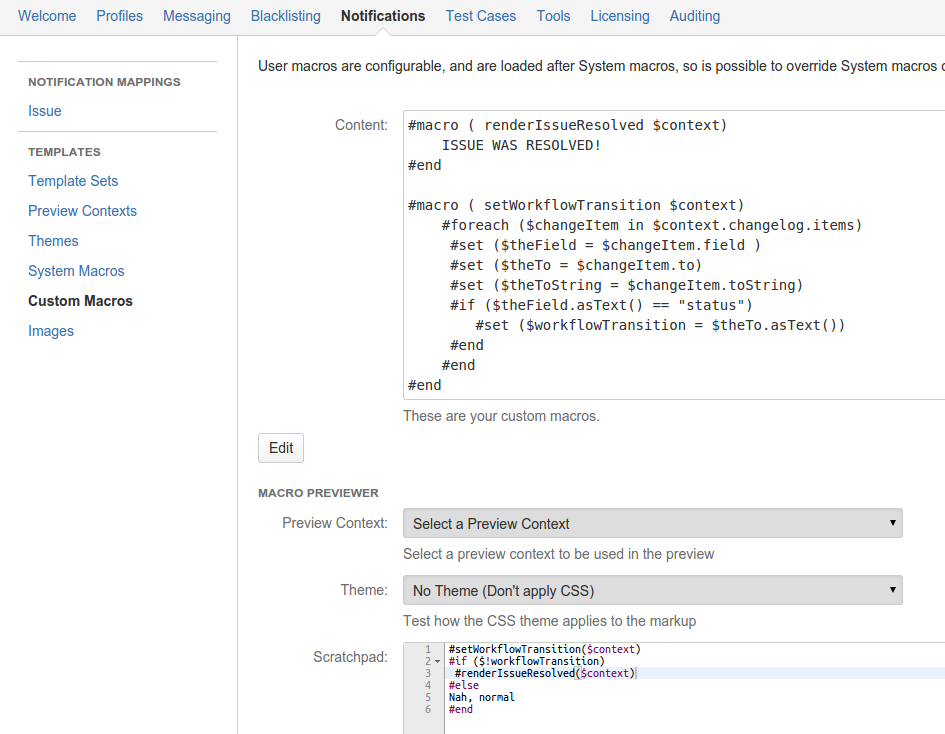
The Custom Macros are user editable, the following text contains the render method that will be called from our template, as well as the workflow transition detector 'helper' method.
#macro ( renderIssueResolved $context)
    ISSUE WAS RESOLVED!
#end

#macro ( setWorkflowTransition $context)
    #foreach ($changeItem in $context.changelog.items)
     #set ($theField = $changeItem.field )
     #set ($theTo = $changeItem.to)
     #set ($theToString = $changeItem.toString)
     #if ($theField.asText() == "status")
        #set ($workflowTransition = $theTo.asText())
     #end
    #end
#end
Testing
Below the Edit area, the Preview Context captured earlier can be selected. This means that data will be available via the $context Velocity reference in templates. The Scratchpad allows you to enter template content and execute it in the Preview Context defined with the edited Macro. It won’t be saved and is just for validating expressions accessing data from the preview context:
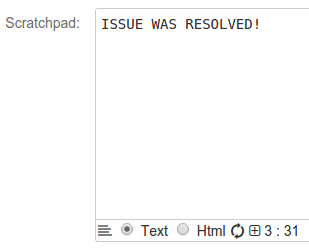
This means that the preview icon  will dynamically do the rendering and show the result, demonstrating (a) The changelog data contained an issue status change matching what was expected, and (b) The content was rendered via macro invocation:
Create and modify a notification template
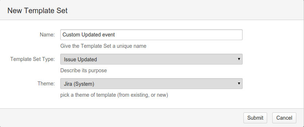
Create a template:

Then set a name, make the type Issue Updated (as issue resolutions will be 'in' the Issue Updated event), and pick a theme, e.g. Jira System):
Use the Preview Context to understand how to access data
Expanded view
For example, when working over $fields.comment.comments in a loop, each comments data can then be accessed as $currentComment.author.displayName.asText().

Here is an example template:
#setWorkflowTransition($context)

#if ($!workflowTransition)
 ## custom workflow occurred
 #if ($workflowTransition == 6)
   #renderIssueResolved($context)
 #end
#else
 ## do the default
#jemhBodyDelimiter()
#set ($fields = $context.issue.fields)
#if ($context.user) $context.user.displayName.asText()#else Anonymous#end updated an issue:  $context.issue.fields.project.name.asText() / $context.issue.key.asText() #jemhIncludeUserRole()
Issue Updated - $fields.summary.asText()
$jemhUtils.setNotify()
Issue Type:     $fields.issuetype.name.asText()
Status:         $fields.status.name.asText()
Assignee:       $fields.assignee.displayName.asText()
Created:        $fields.created.asText()
Priority:       $fields.priority.name.asText()
Reporter:       $fields.reporter.displayName.asText()
#if ($!fields.security())
Security Level: $fields.security.name.asText()
#end
#foreach( $comment in $context.comments )
#set ($dateObj = $dateFormatter.getDate($comment.created.asText()))
[created by $comment.author.displayName.asText() on $dateFormatter.format($dateObj, "dd/MMM/yy h:mm a")]
--
$comment.body.asText())
--
#end

#end
Using the text preview again, we get to see the rendered output showing the custom output for issue resolution.
To further be sure this is doing the right thing, change the Preview Context to be an event that is not an issue resolution. Doing so will automatically re-render the content, and you'll find it isn't on the Resolved screen any more.
With the Preview Context and Template rendering features you can validate correct behaviour up front, saving time!
Example templates
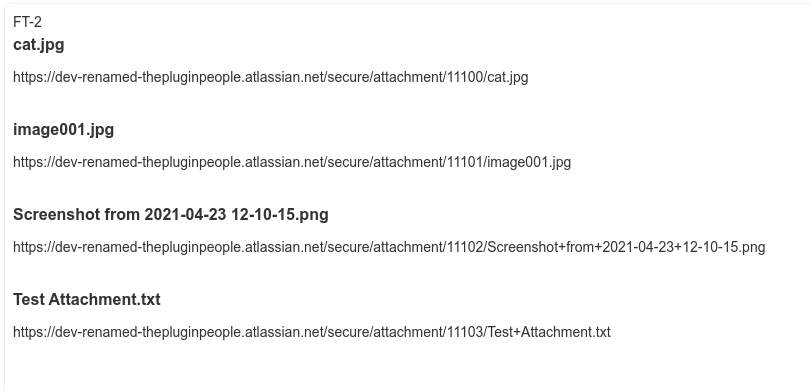
Identifying recent attachments to notifications
Adding all attachments from an issue to a template could be problematic if a large quantity of attachments where present on an issue. The following script can be used to identify if attachments where recently added to the issue.
Template
$context.issue.key.asText()
$jemhUtils.setCommentRendered()
#set($attachments = $context.issue.fields.attachment)
##If there are attachments present on the issue ...
#if($attachments)
    ##record current time
    #set($timeNow = $jemhDateUtils.nowDate().getTime())
    ##for each attachment....
    #foreach($attachment in $attachments)
        ##retrieve the time the attachment was added to the issue
        #set($created = $attachment.created)
        ##if not null
        #if($created.asText())
            ##get the number of milliseconds between now and the attachment being added
            #set($timeSinceAdded = $timeNow - $jemhDateUtils.getDate($created).getTime())
            ##set time frame to 5 minuets in milliseconds
            #set($timeFrame = (60 * 1000) * 5)
            ##if time since the attachment was added is less than or equal to the time frame ...
            #if($timeSinceAdded <= $timeFrame)
                <h3>$attachment.filename.asText()</h3>
                <p>$attachment.content.asText()</p>
            #end
        #end
    #end
#end
How it looks